Note: This guide is for Kinetic (22.10). For newer versions of Vanilla OS, refer to https://docs.vanillaos.org/collections/handbook for the latest documentation.
Preparation
Requirements
- A flash drive with at least 8GB of capacity.
- A 64 bit (amd64) [x64] processor.
- A drive with at least 50GB of storage space (required for ABRoot A/B partitions).
- At least 4GB of RAM (8GB recommended).
- 30 minutes to an hour of your time.
- Good to have Secure Boot enabled.
Creating a bootable USB stick
This section will guide you through creating a bootable USB stick with Vanilla OS on it.
Downloading Vanilla OS
First, download the Vanilla OS disk image that will be written to your USB flash drive from here.
Installing Etcher
To flash the disk image to your USB stick, download and install balenaEtcher.
If you wish, you can also use different software that you are familiar with, such as Ventoy or Rufus.
Flashing the image
Warning: this will erase all data on your USB flash drive. Make sure to back up all your important data before proceeding!
Open Etcher, select the downloaded disk image and your USB flash drive, then click “Flash!”.
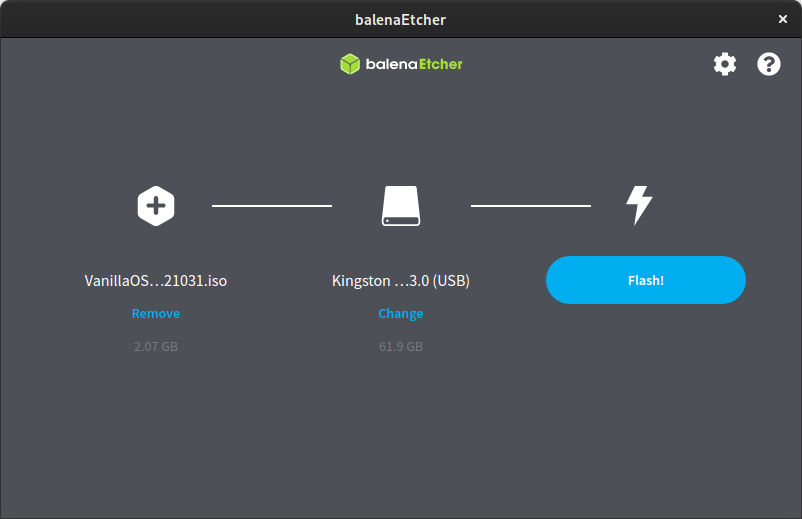
When the process is done, you will have a bootable USB stick with Vanilla OS on it.
Booting from the USB flash drive
Insert the USB flash drive into the computer to which you want to install Vanilla OS and power up or restart the device.
If your device does not automatically boot into the Vanilla OS installation media, reboot, and while it is starting up, hold down the key to select boot device or for boot menu indicated by a prompt on the boot screen. The most common keys are F2, F10, F11, F12, Delete and Escape. If the prompt isn’t present, try searching online for your specific model. Select Vanilla OS or the name of your USB flash drive from the boot menu.
When your device has successfully booted from the USB stick, you should see a welcome screen inviting you to try or install Vanilla OS.

You can try Vanilla OS without making any changes to your device. If you are satisfied, you can re-open the installer (the first icon in the dash) and proceed with the installation.
Installing Vanilla OS
First steps
Click “Install Vanilla OS” and set your preferred language, keyboard layout and timezone.
Types of installation
Depending on whether you want to dual- or multiboot Vanilla OS alongside other operating systems, you will need to follow different steps when selecting your disk.
This guide will help you with the following types of installation:
Installing only Vanilla OS
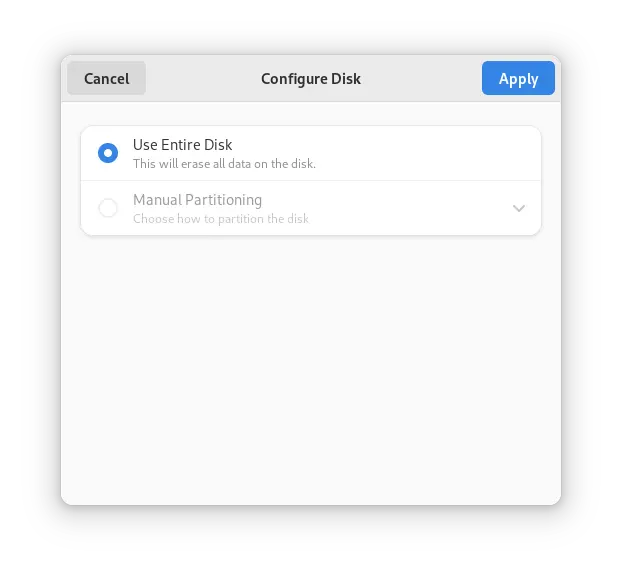
This section will guide you through installing Vanilla OS to an entire disk, erasing all previous data on it. Make sure to back up all your important data before proceeding!
Select the disk you want to install Vanilla OS to, click “Configure”, select “Use Entire Disk”, click “Apply” and review your changes.
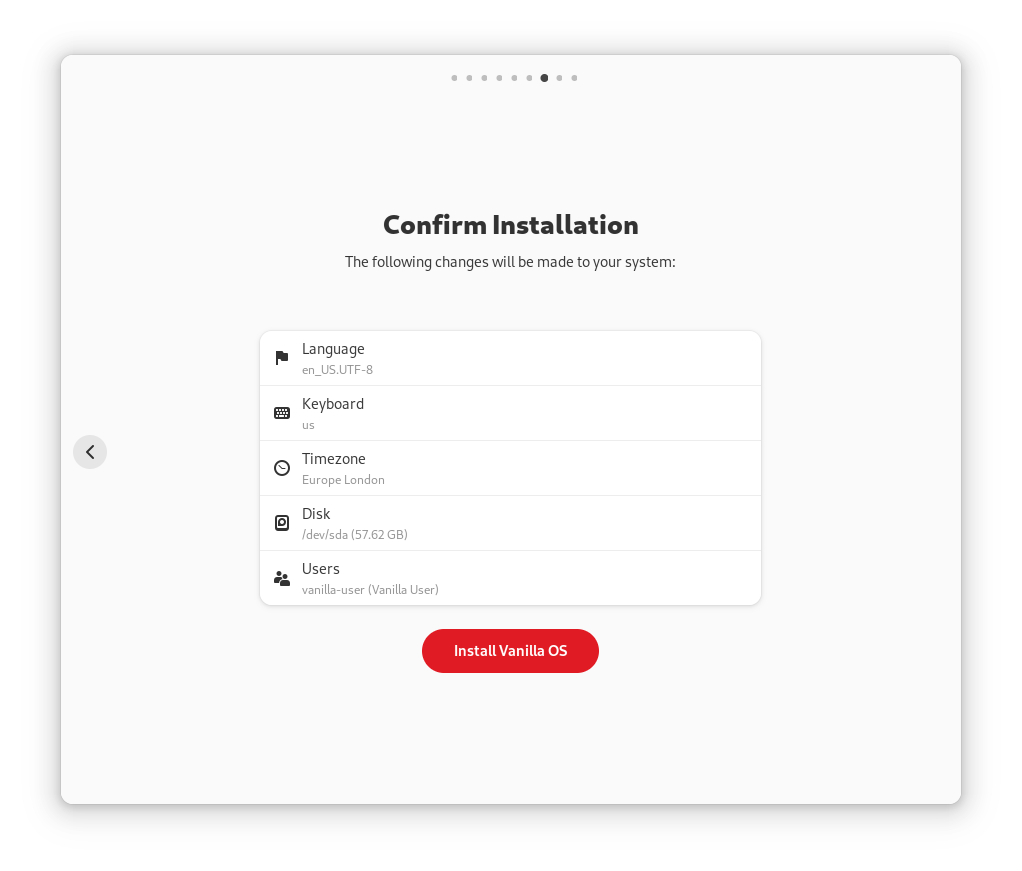
Create your user account and review the changes that will be made to your system. Click on “Install Vanilla OS” and the installation will begin.
Booting into Vanilla OS
If you only have Vanilla OS installed
After the installer finishes, all you need to do is reboot and remove the USB stick. Vanilla OS will be waiting for you.
If you dual- or multiboot
On the same drive
After the installer finishes, all you need to do is reboot and you will see a boot menu with your installed operating systems. Select Vanilla OS, wait for it to boot and remove the USB stick.
On different drives
After the installer finishes, you need to reboot and select Vanilla OS from your device’s boot menu that you can access by holding down a specific key while the device is starting up indicated by a prompt on the boot screen. If the prompt isn’t present, try searching online for your specific model. Once you’re in Vanilla OS, remove the USB stick.
You can configure the default boot order in your device’s firmware settings.
First Setup
After installing Vanilla OS, you can follow the First Setup guide to set up your system.